A practical walkthrough for filmmakers already using Cinapse.
The new Reports are live in your account. This guide covers everything: from the new Reports home screen to building, customizing, previewing, and saving reports and presets.
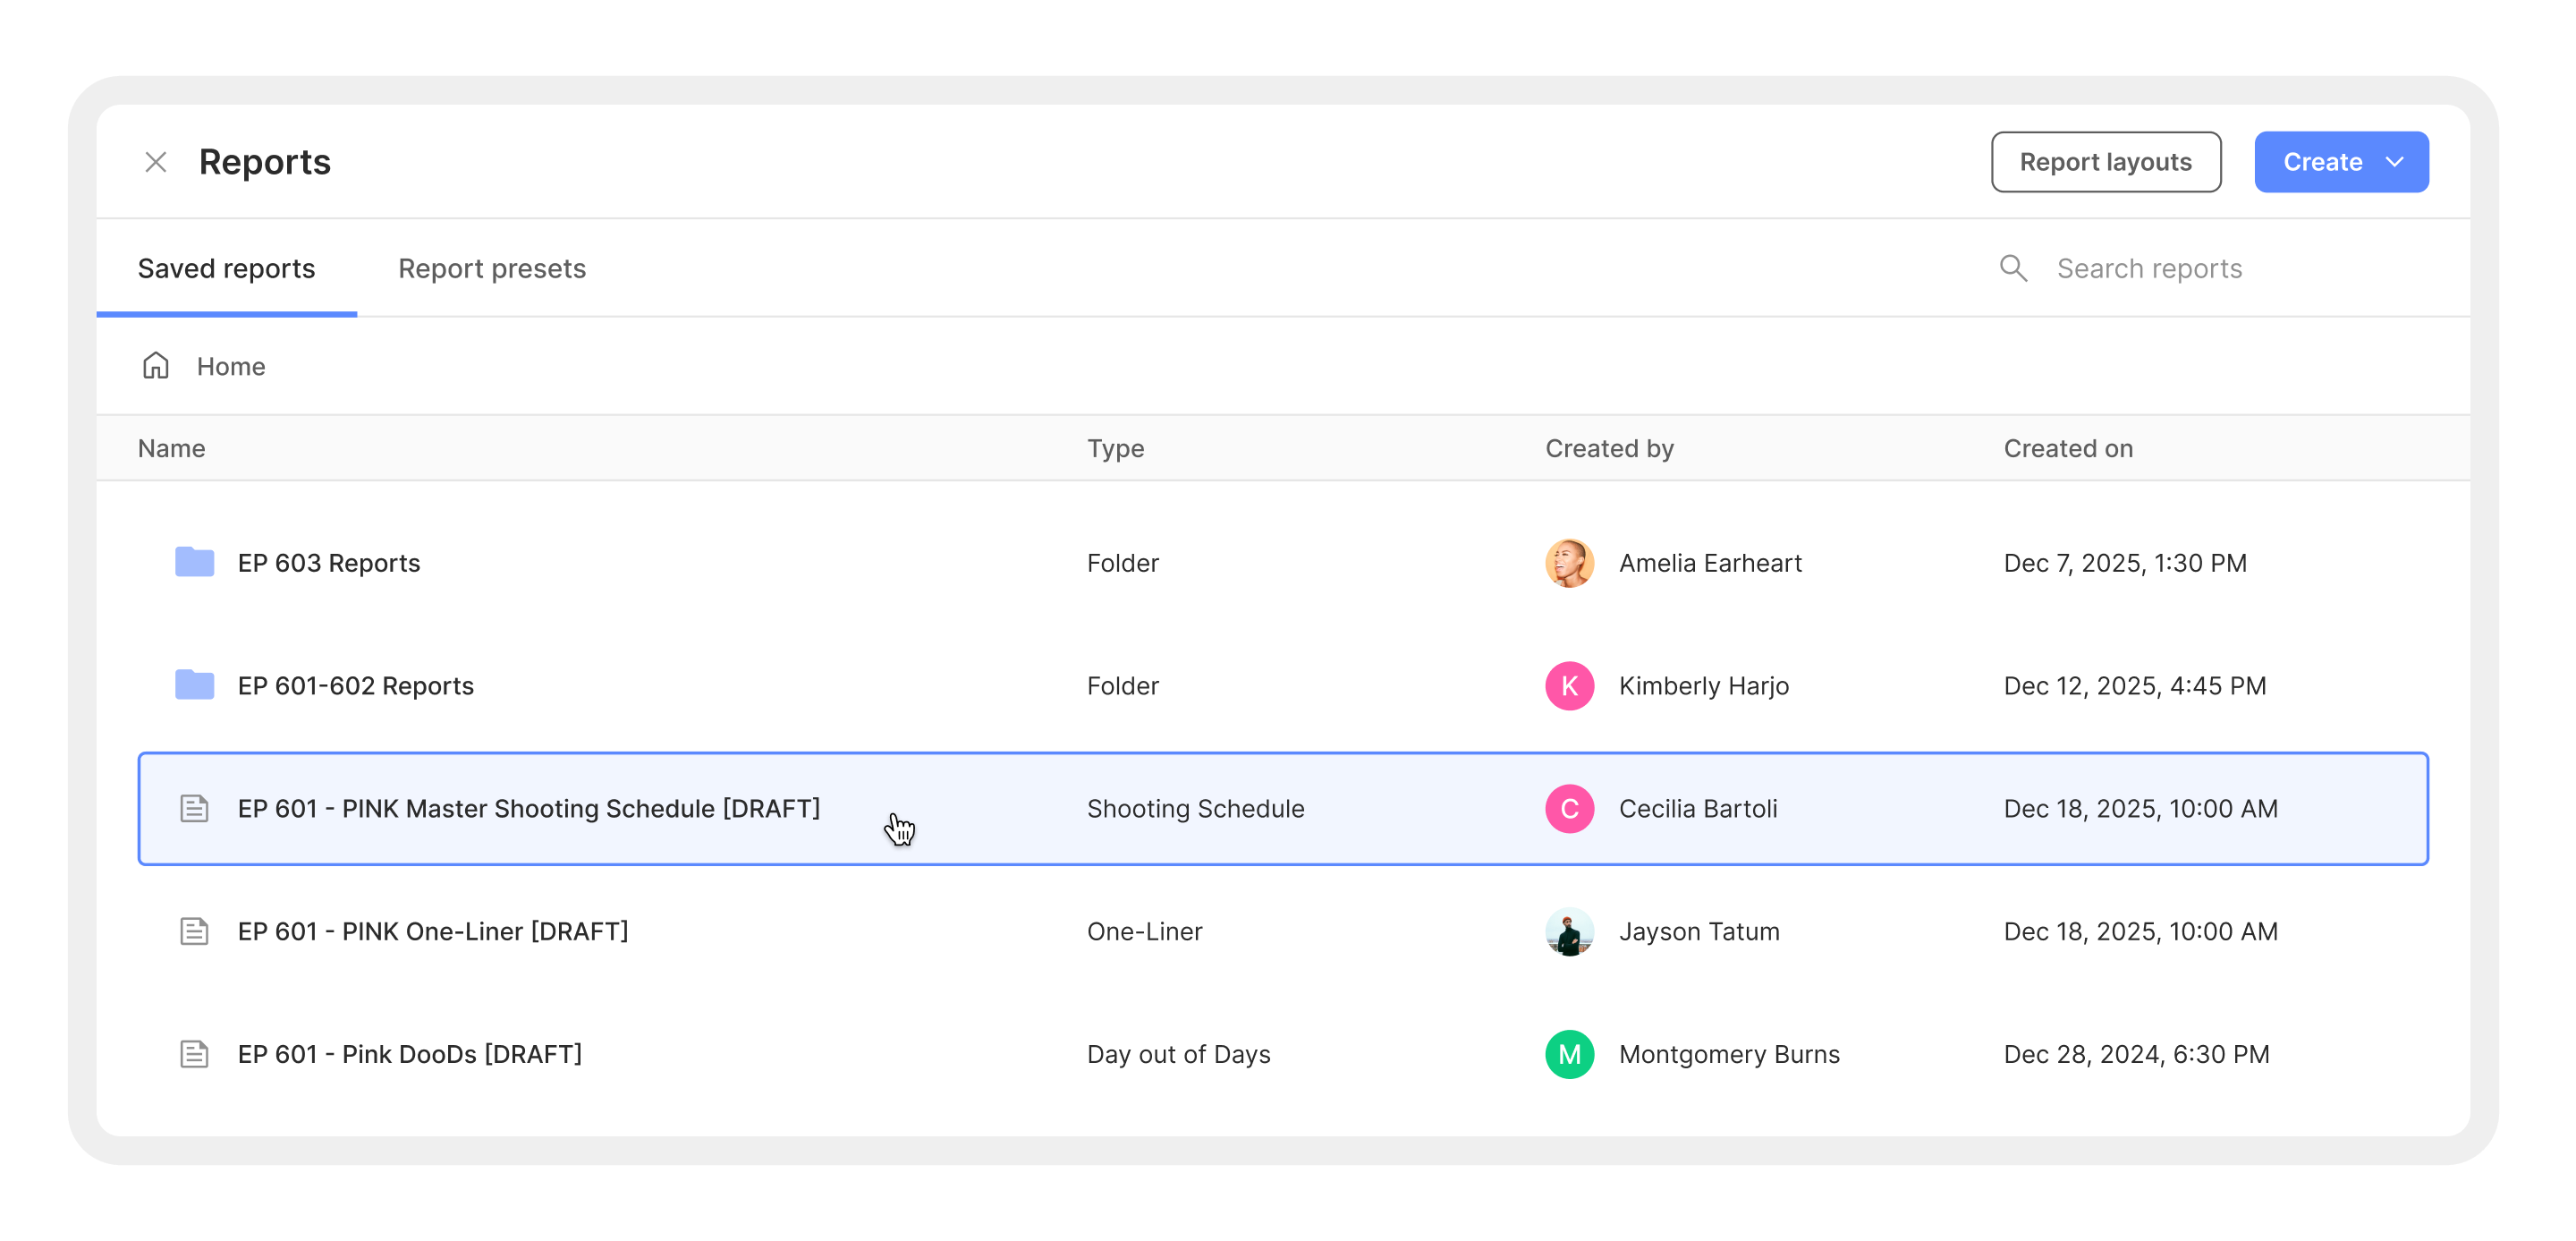
The Reports home screen
Navigate to Reports from the top nav breadcrumb. You'll land on the Reports home screen, which now has two tabs:
Saved reports — All of your generated reports, organized in folders. Double-click any folder to open it, and use the breadcrumb navigation at the top to go back.
Report presets — Where your saved report presets live (more on this below).
Two key buttons in the top-right corner:
Report layouts — Opens the header and footer layout builder, where you design custom headers and footers for different report types.
Create — A dropdown with four options: New folder, New report, New reports from presets, and Upload file.
You can right-click any saved report to access quick actions: Rename, Cut, Paste, Download as PDF, Export as CSV, New folder, and Delete.
Creating a new report
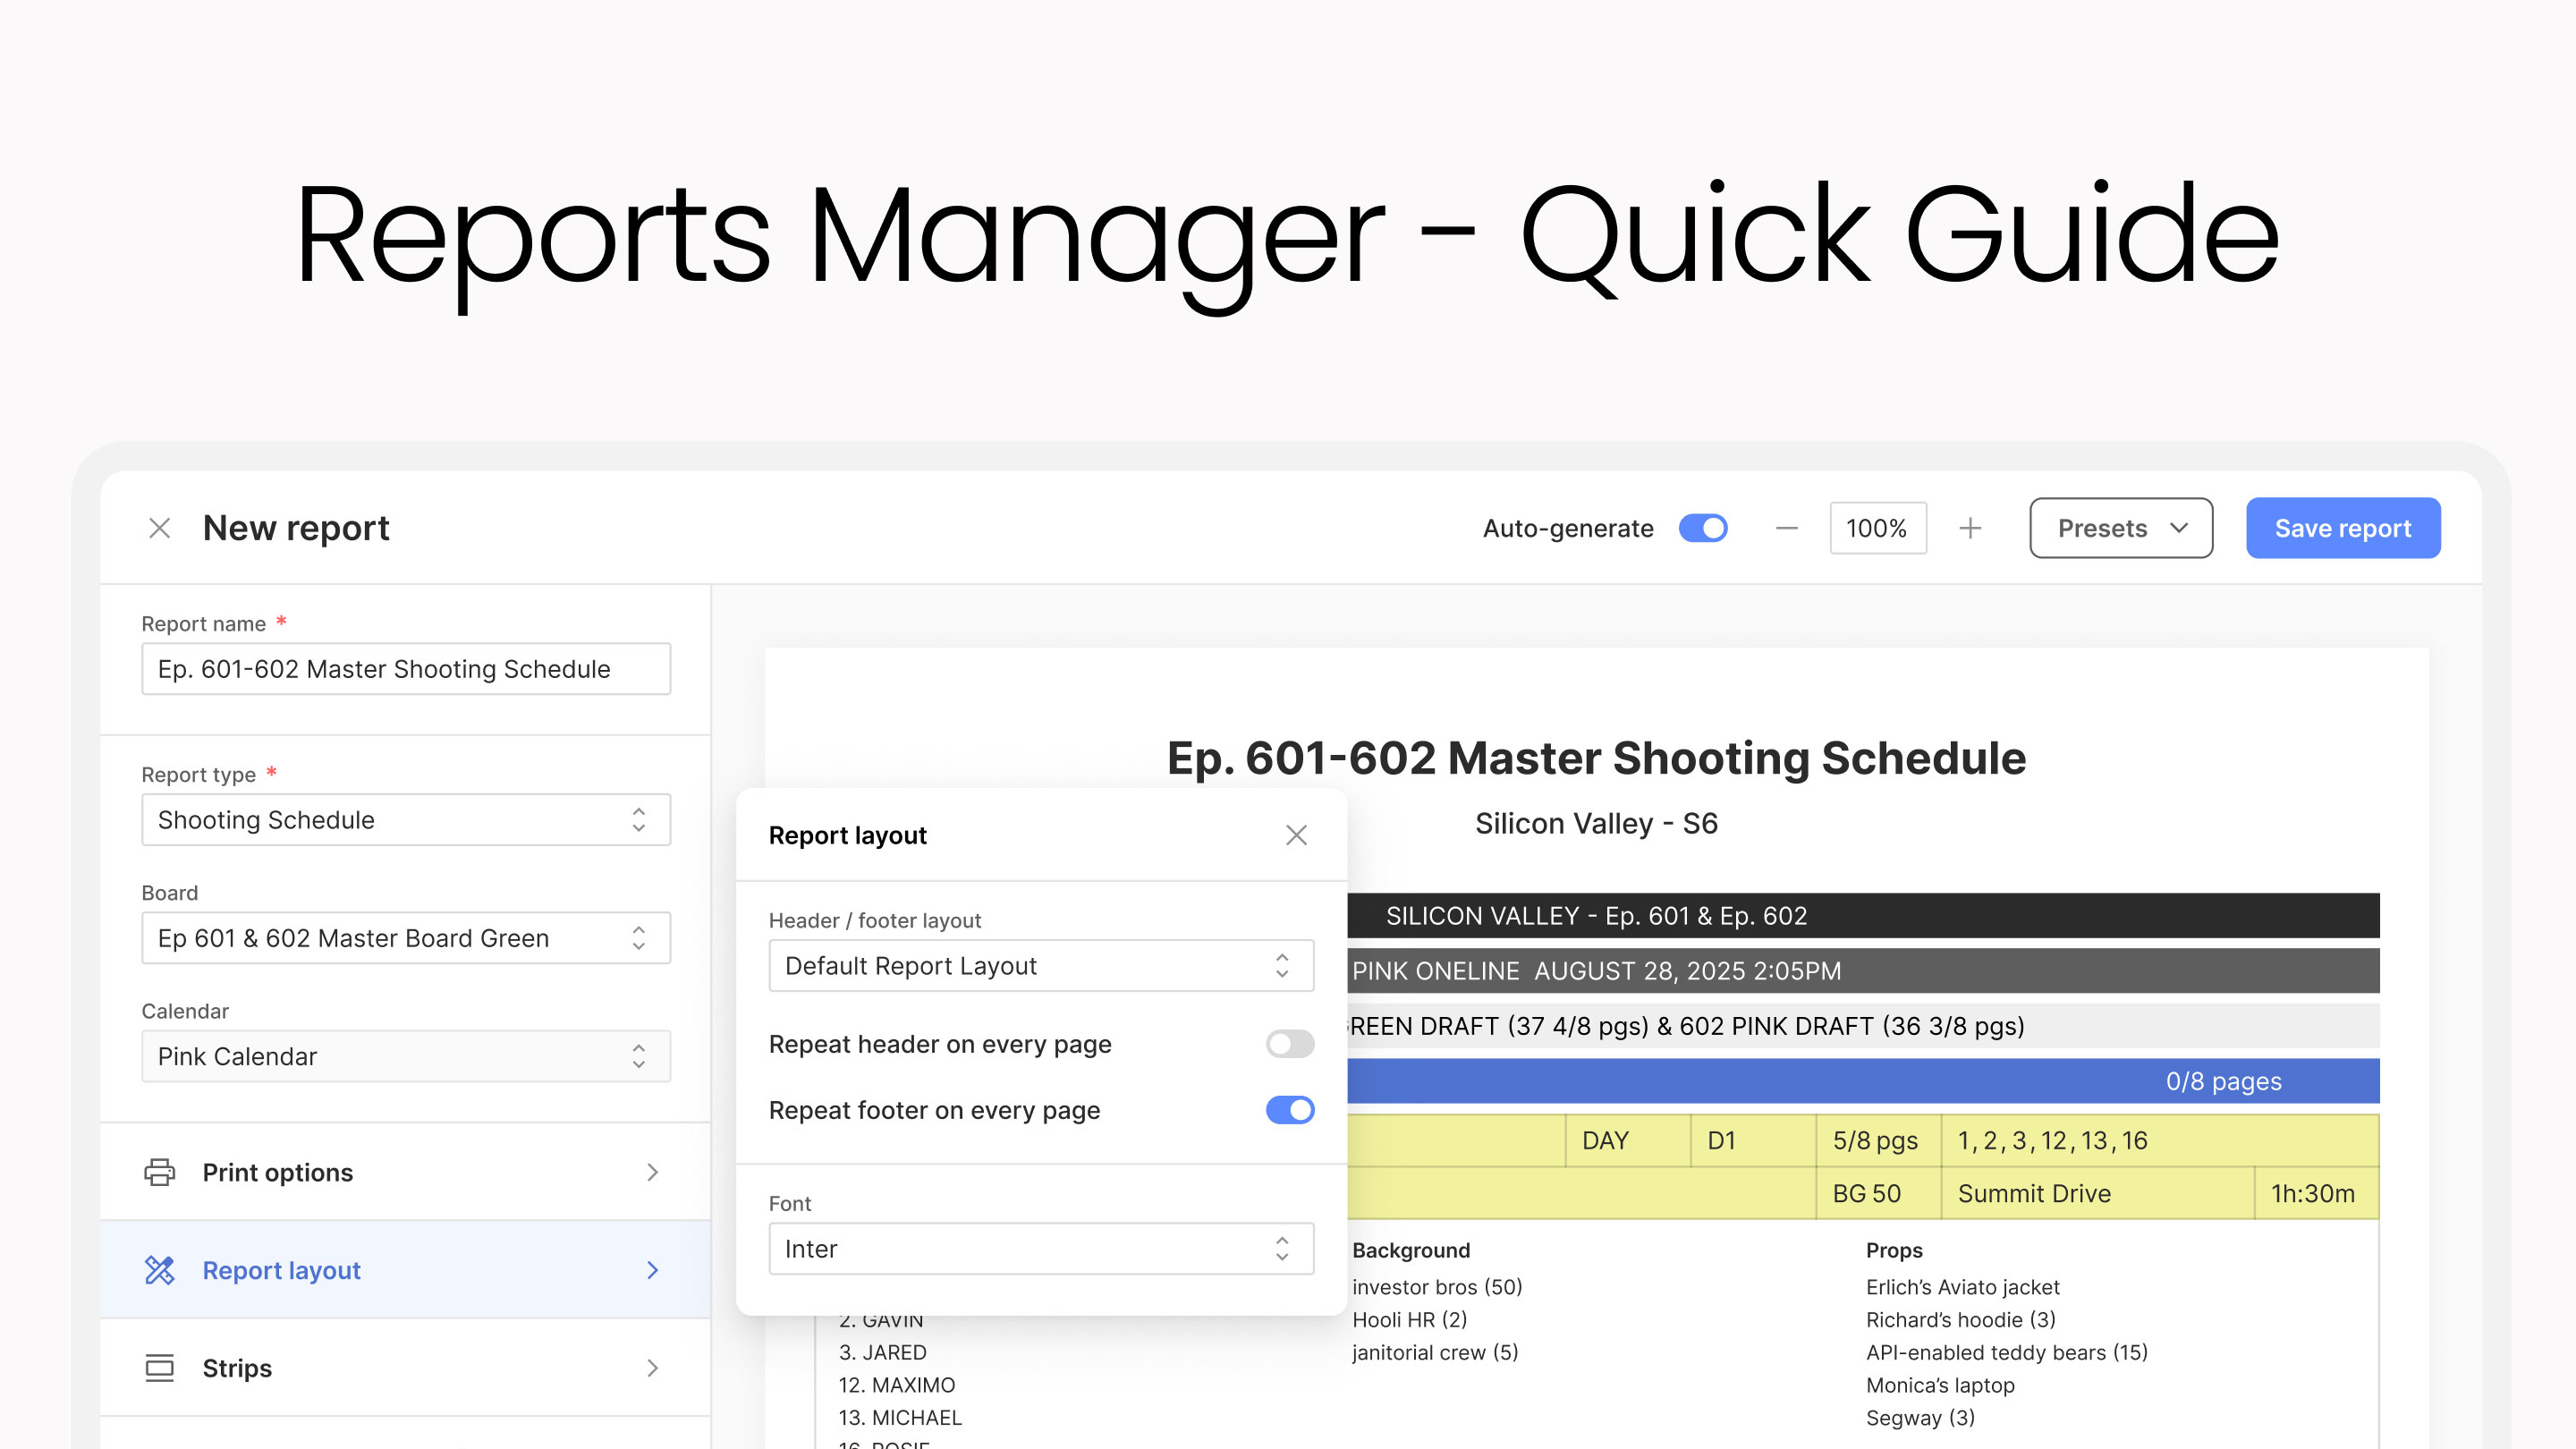
Click Create > New report. This opens the report builder with a left-side configuration panel, a top toolbar, and a live PDF preview on the right.
Left sidebar: basic settings
At the top of the left sidebar, you'll configure four fields:
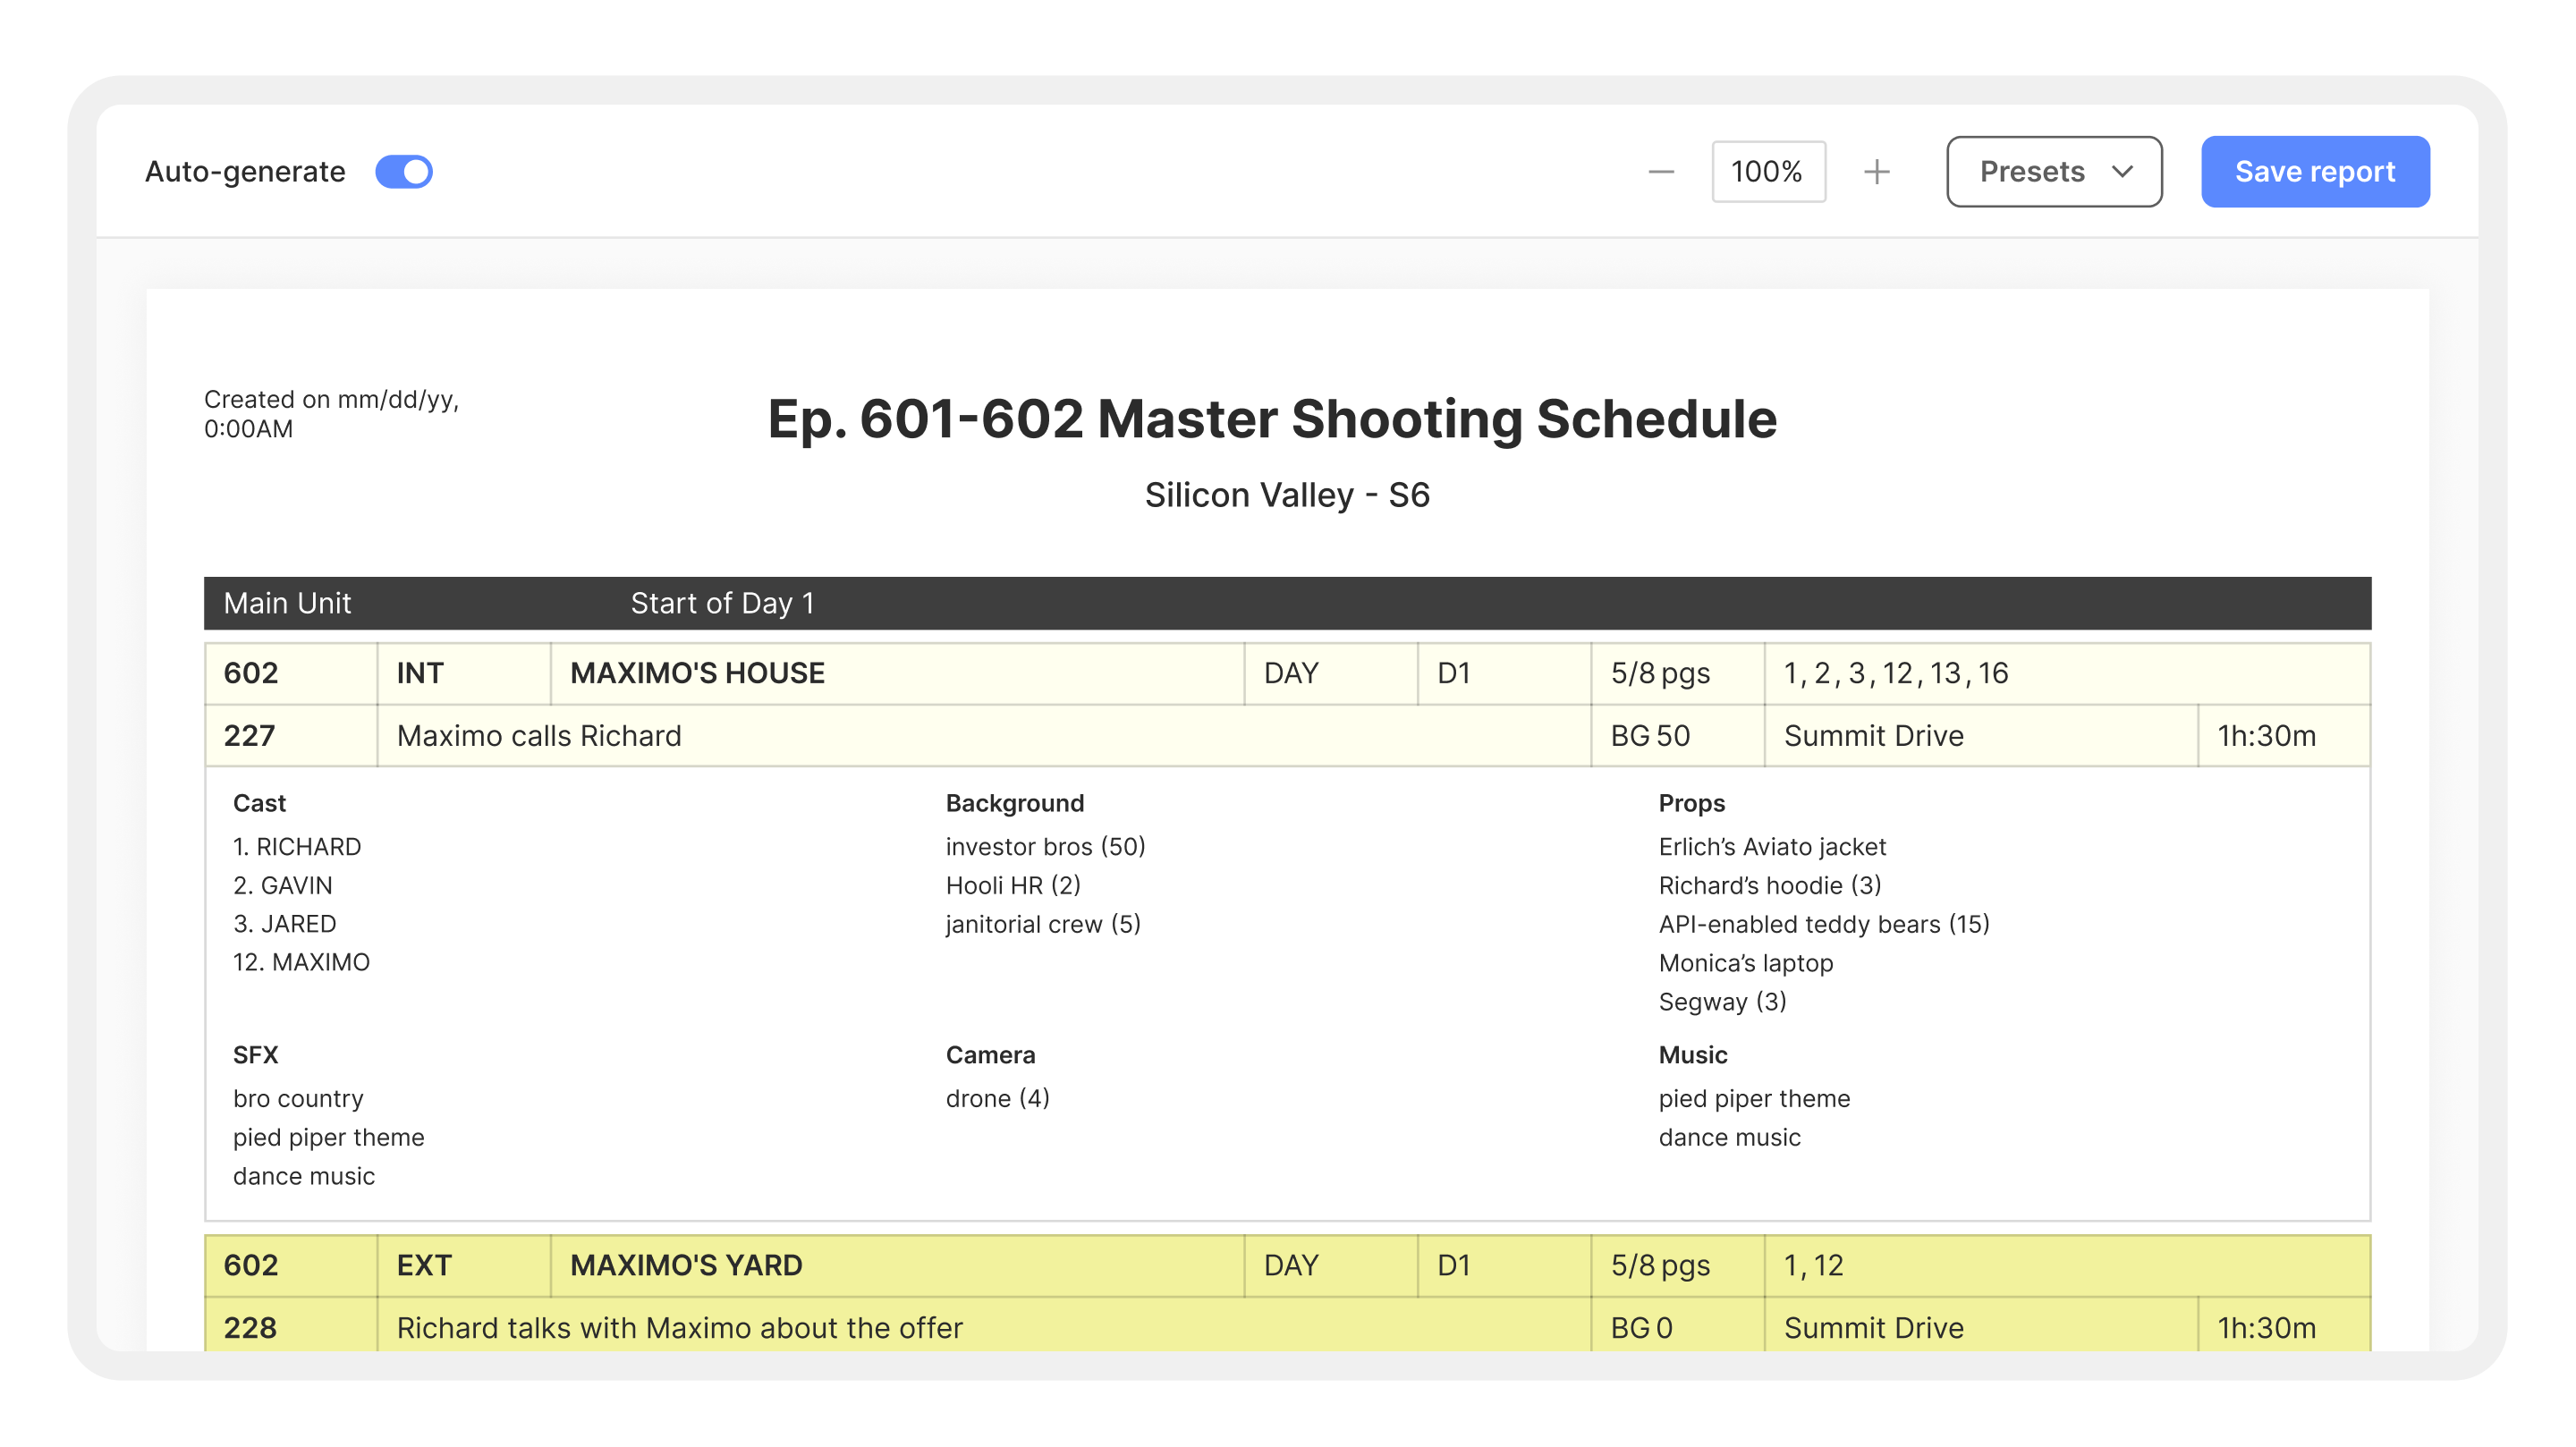
Report name — Give your report a name (e.g., "Ep. 601-602 Master Shooting Schedule").
Report type — Choose from Shooting Schedule, One-Liner, Day out of Days, or other available types.
Board — Select which board to pull data from (e.g., "601 & 602 - Master").
Calendar — Choose the calendar (e.g., "PINK Calendar").
Left sidebar: customization sections
Below the basic settings, six collapsible sections let you dial in every aspect of your report. Click any section name to expand it.
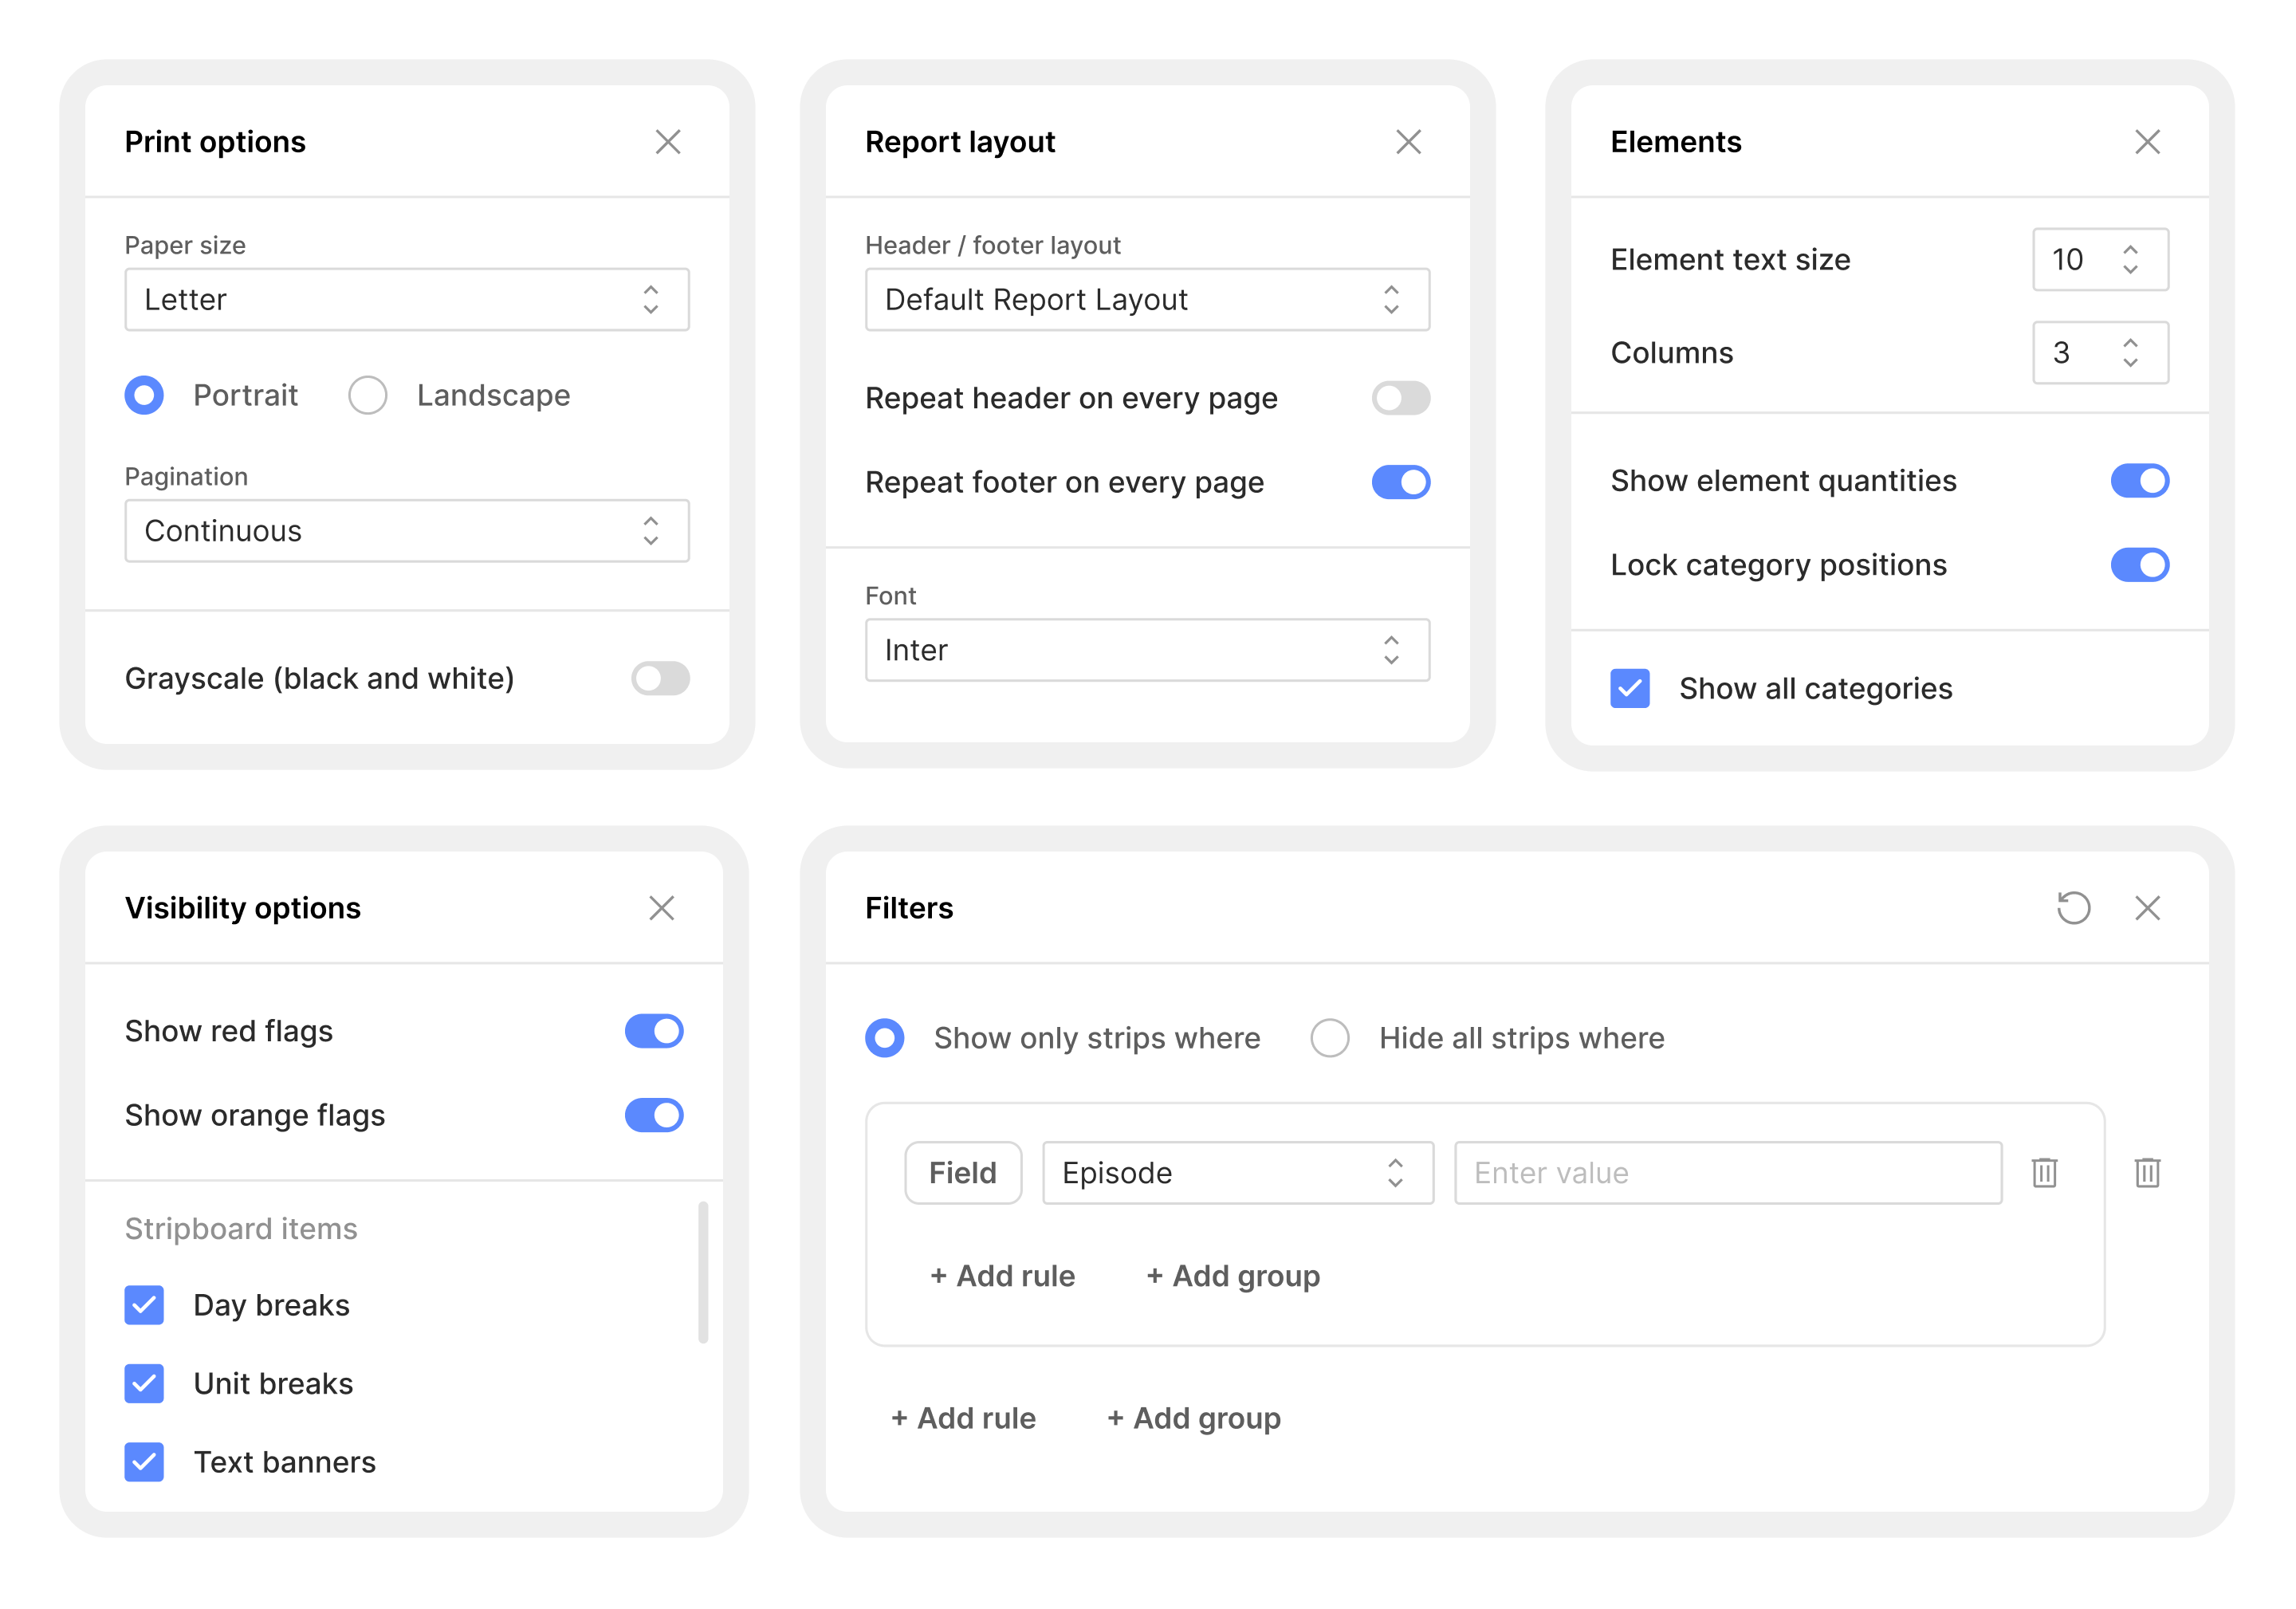
Page layout
Header / footer layout — Select from your saved layouts (e.g., "Default Report Layout"). This is where your custom headers and footers are applied. Different report types can use different layouts.
Paper size — Choose Letter, Legal, or A4.
Orientation — Portrait or Landscape.
Pagination — Set to Continuous or 1 record per page.
Strips
Strip layout — Choose from available strip layouts (e.g., "Default TV Layout 1 (Timed)").
Strip color palette — Select a color scheme (e.g., "Default Colors").
Hide padding between strips — Toggle on for a denser layout.
Show unscheduled strips — Toggle on to include strips not yet on the schedule.
Elements
Element text size — Set the font size for element text (e.g., 8).
Columns — Control how many columns elements are displayed in (e.g., 3).
Show element quantities — Toggle to show counts next to elements.
Lock category positions — Toggle to keep categories in fixed positions.
Category visibility — Check or uncheck individual categories to show or hide them: Cast, Background, Props, Vehicles, Wardrobe, and more. Use "Show all categories" to toggle everything at once.
Visibility options
Show red flags / Show orange flags — Toggle flag visibility on or off.
Stripboard items — Check or uncheck: Day breaks, Unit breaks, Text banners, and Start-of-day banners.
Date / day range
Range — Choose between Date or Shoot Day range.
Start date / End date — Set the window of data to include in the report.
Filters
This is the new layered filter builder. It supports complex AND/OR logic:
Click + Add rule to add a filter condition. Each rule has a Field (e.g., Episode, Elements), a sub-field if applicable (e.g., Cast, Location), and a value.
Click + Add group to create a nested group of rules with its own AND/OR logic.
Choose between "Show only strips where" and "Hide all strips where" at the top of the filter panel.
Stack as many rules and groups as you need. Remove any rule with the trash icon.
Example: To show only strips from Episode 602 where Richard or Gavin appear at the Summit Drive location, you'd build three AND rules — Field: Episode = 602, AND Elements > Cast = 1. RICHARD, 2. GAVIN, AND Elements > Location = Summit Drive.
The toolbar
Across the top of the report builder, a toolbar gives you quick access to global settings:
Board selector and Calendar selector — Same as the sidebar, accessible here for quick switching.
Layout selector — Switch strip layouts without opening the Page layout section.
Color scheme selector — Switch color palettes on the fly.
Zoom controls — Use −, 100%, and + to zoom in and out of the PDF preview.
Save / load preset — Save your current configuration as a preset, or load a previously saved one.
Save report — Generate and save the final report.
Using the live PDF preview
The entire right side of the screen is a high-fidelity PDF preview. It shows your report exactly as it will look when generated — headers, footers, strip data, elements, page breaks, margins, and all.
Every change you make in the sidebar or toolbar updates the preview in real time. Use this to:
Verify your paper size and orientation look right before generating.
Check that your filters are showing the correct strips.
Confirm text size is legible for your use case (screen vs. print).
Spot page break issues before they become problems.
When you're satisfied, click Save report in the top-right corner.
Report presets
Presets are one of the most powerful new features. They save your entire report configuration — report type, page layout, strips, elements, visibility, filters, everything — so you can reuse it without rebuilding from scratch.
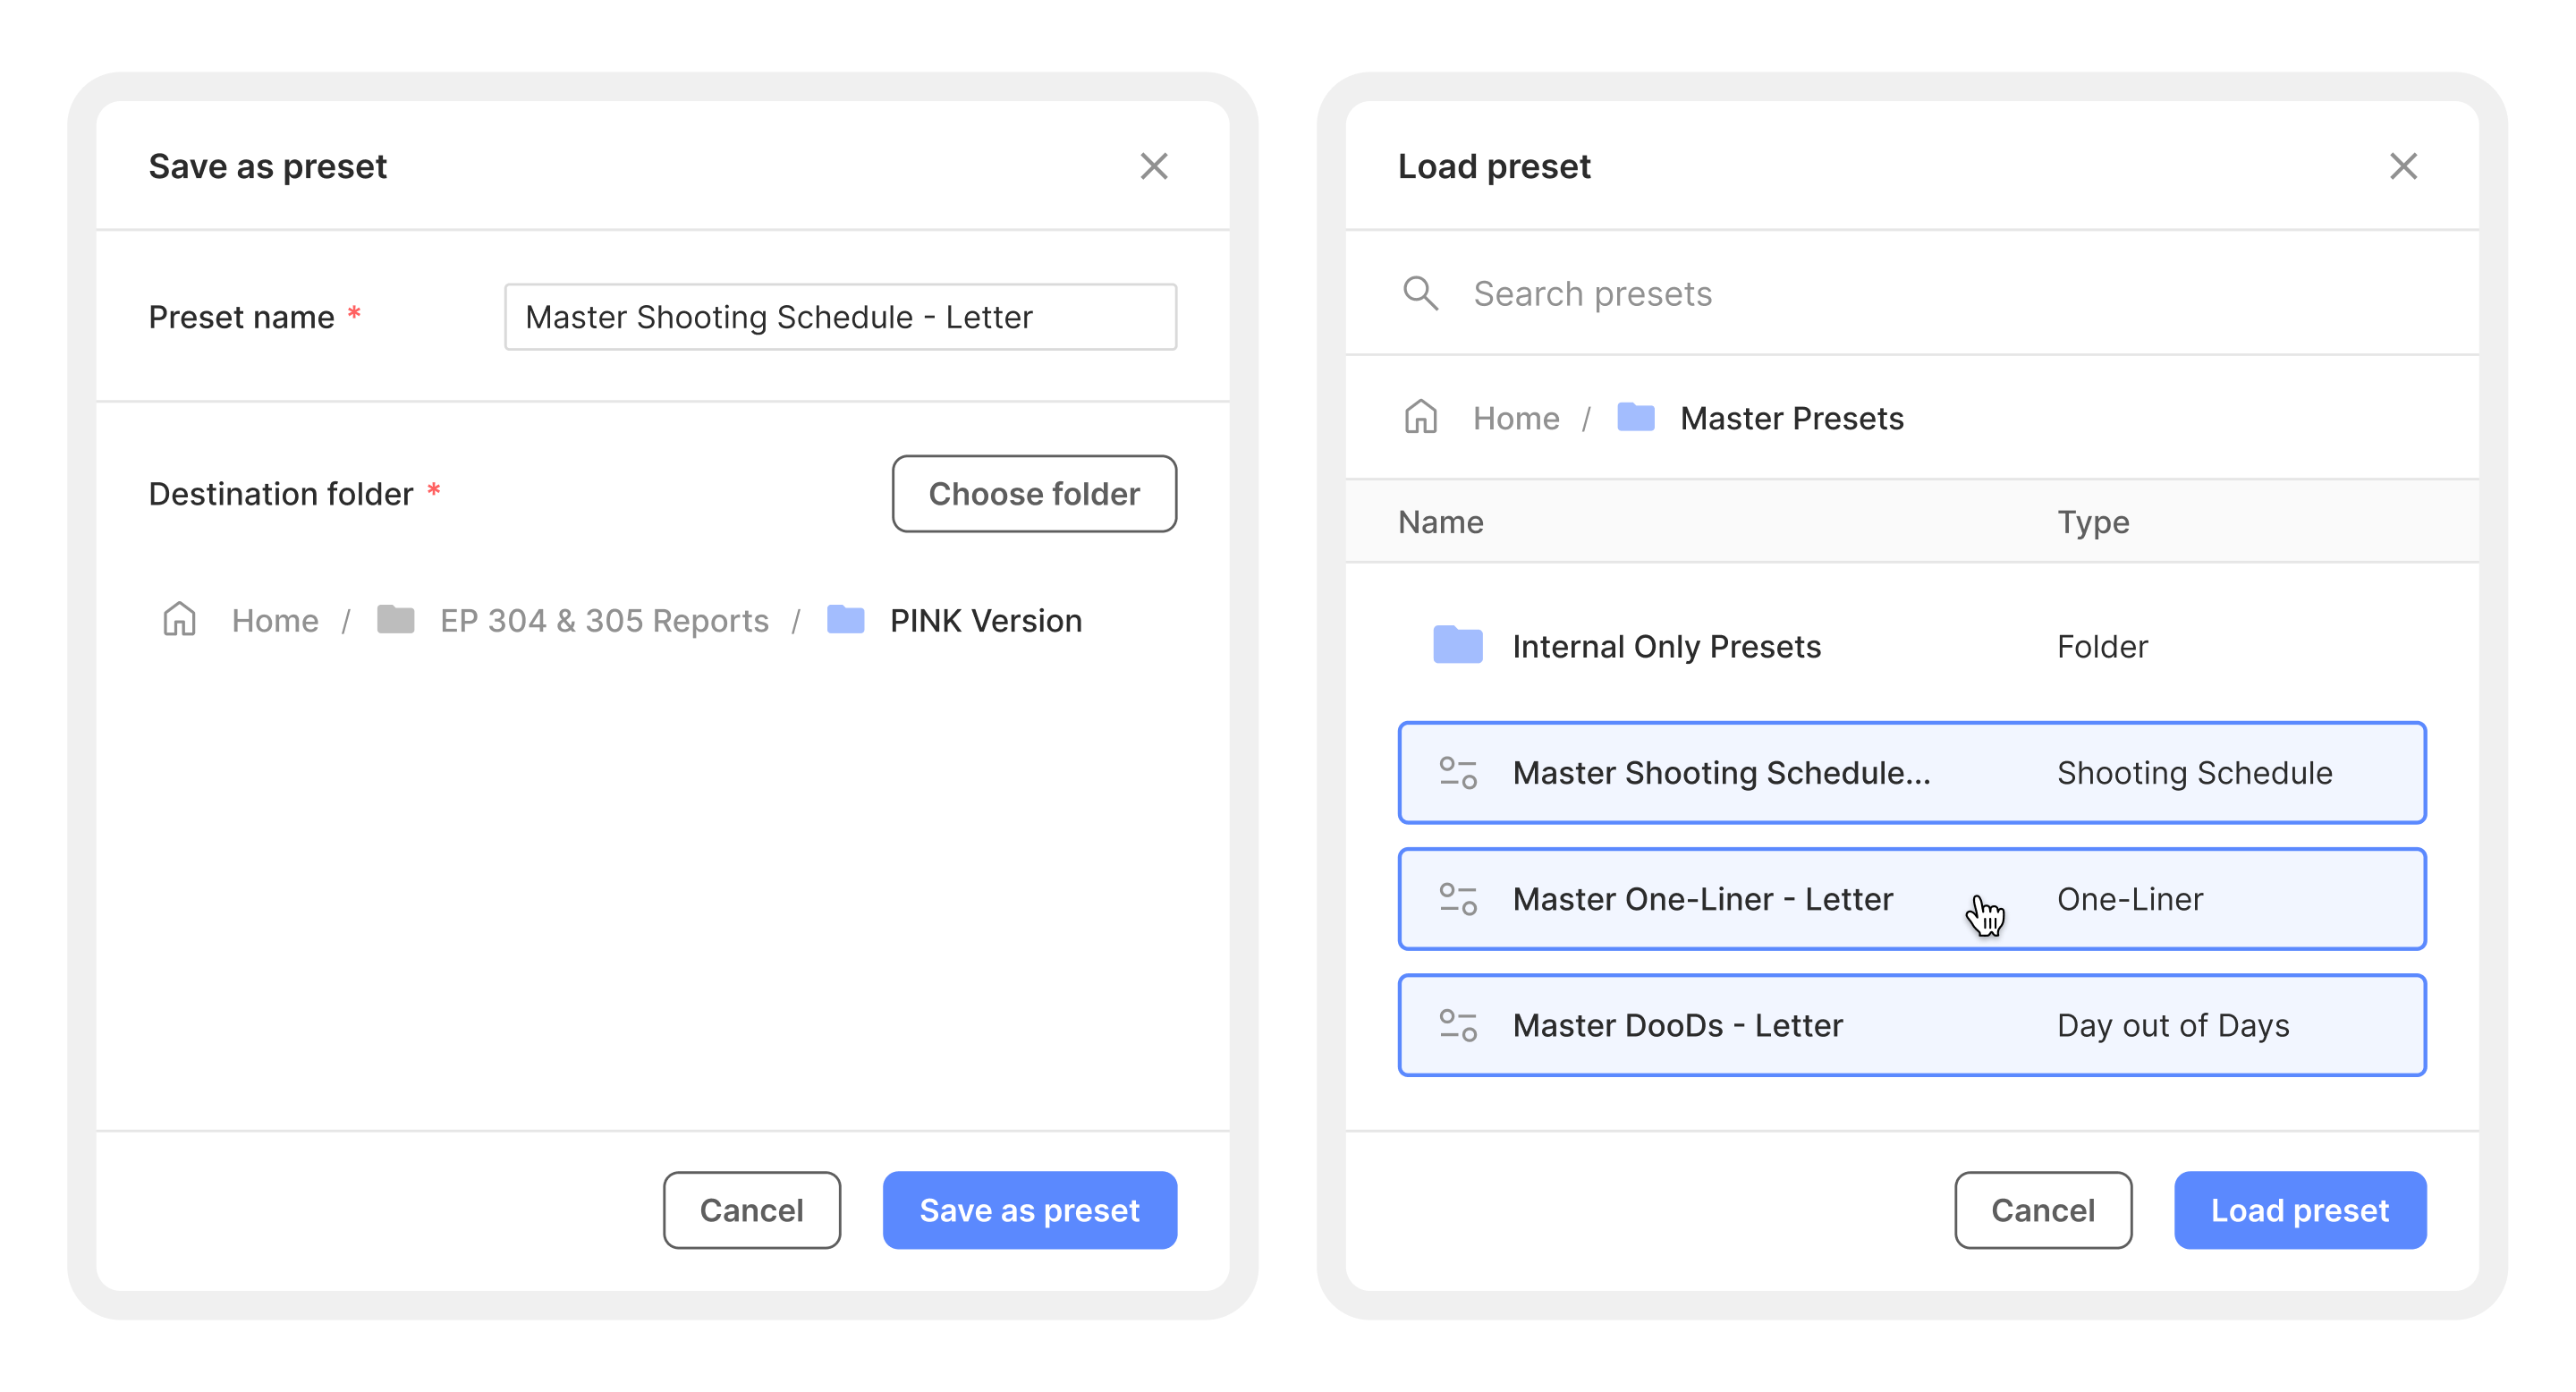
Saving a preset
Configure a report the way you want it.
Click Save / load preset in the toolbar, then select Save as preset.
In the dialog, enter a Preset name (e.g., "Master Shooting Schedule - Letter").
Choose a Destination folder — click "Choose folder" to browse or create a new folder.
Click Save as preset.
Your preset is now saved and available under the Report presets tab on the Reports home screen.
Loading a preset
When creating a new report, click Save / load preset in the toolbar, then select Load preset.
Browse or search your saved presets. They're organized in folders (e.g., "Studio Export Presets", "Internal Only Presets", "Budgeting Presets").
Select a preset and click Load preset.
Your entire report configuration is applied instantly. Adjust anything you need, or go straight to saving.
Generating multiple reports from presets
This is a major time-saver. Instead of creating reports one at a time, you can generate several at once from your saved presets:
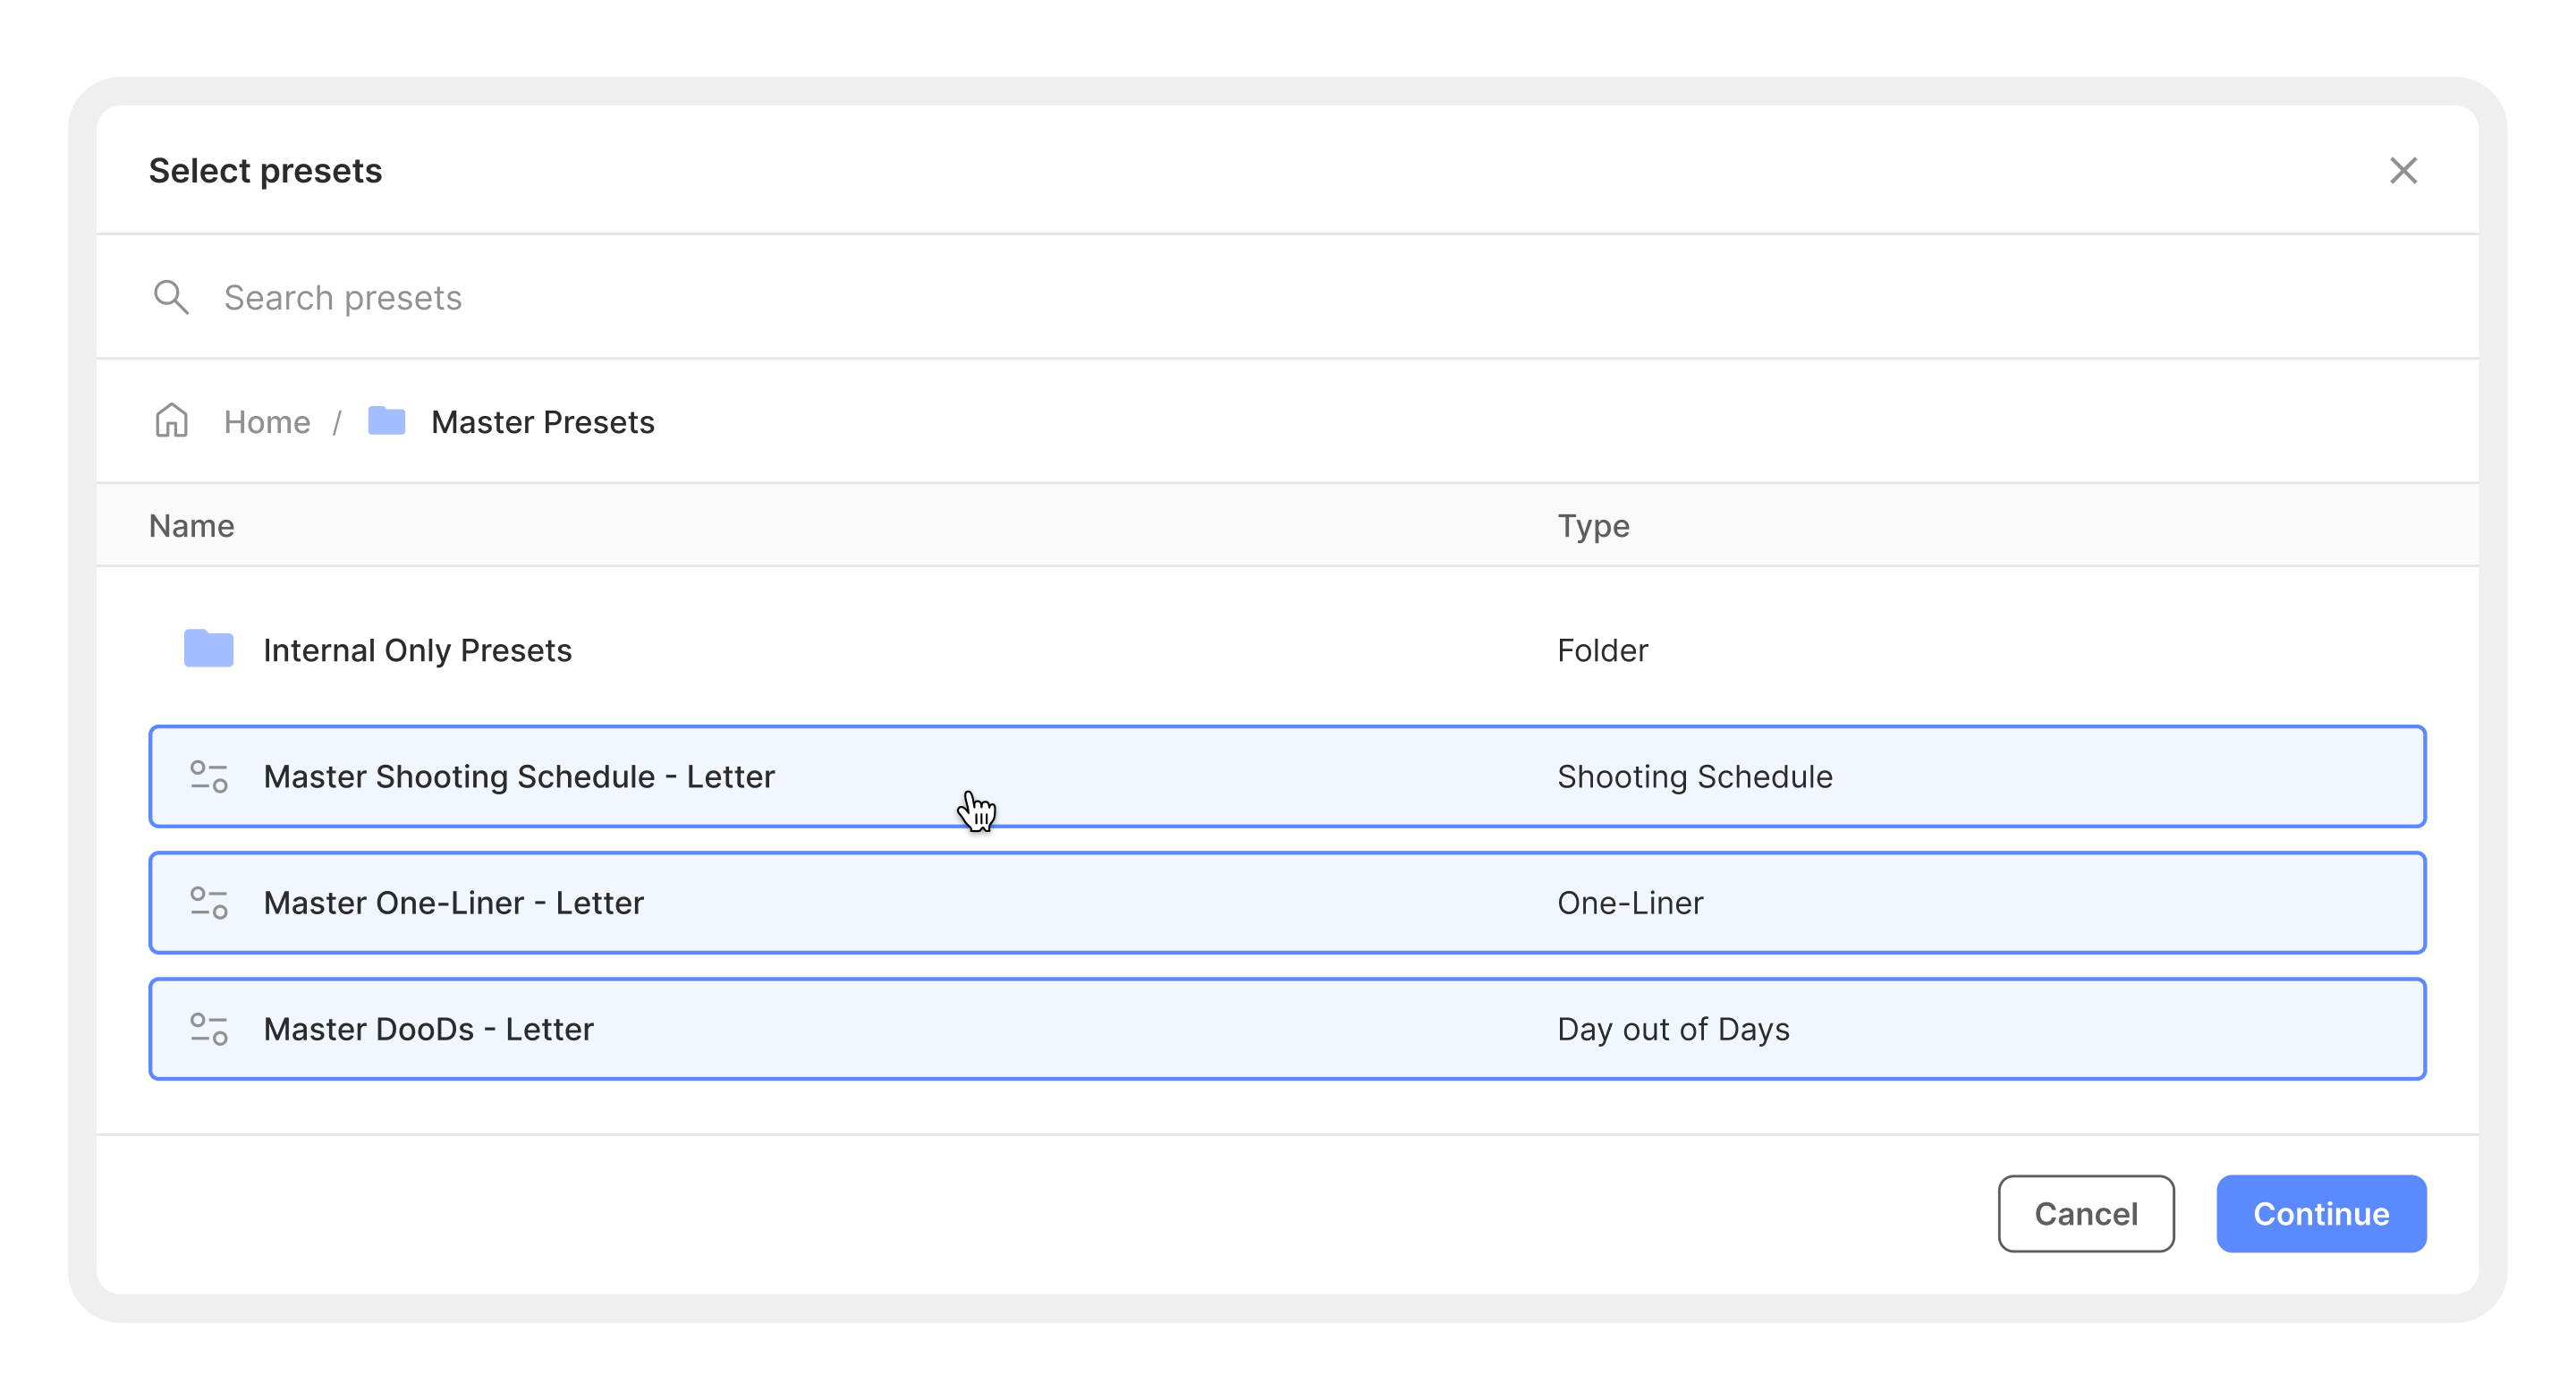
From the Reports home screen, click Create > New reports from presets.
In the "Select presets" dialog, browse your preset folders and select multiple presets (e.g., "Master Shooting Schedule - Letter", "Master One-Liner - Letter", "Master DooDs - Letter").
Click Continue.
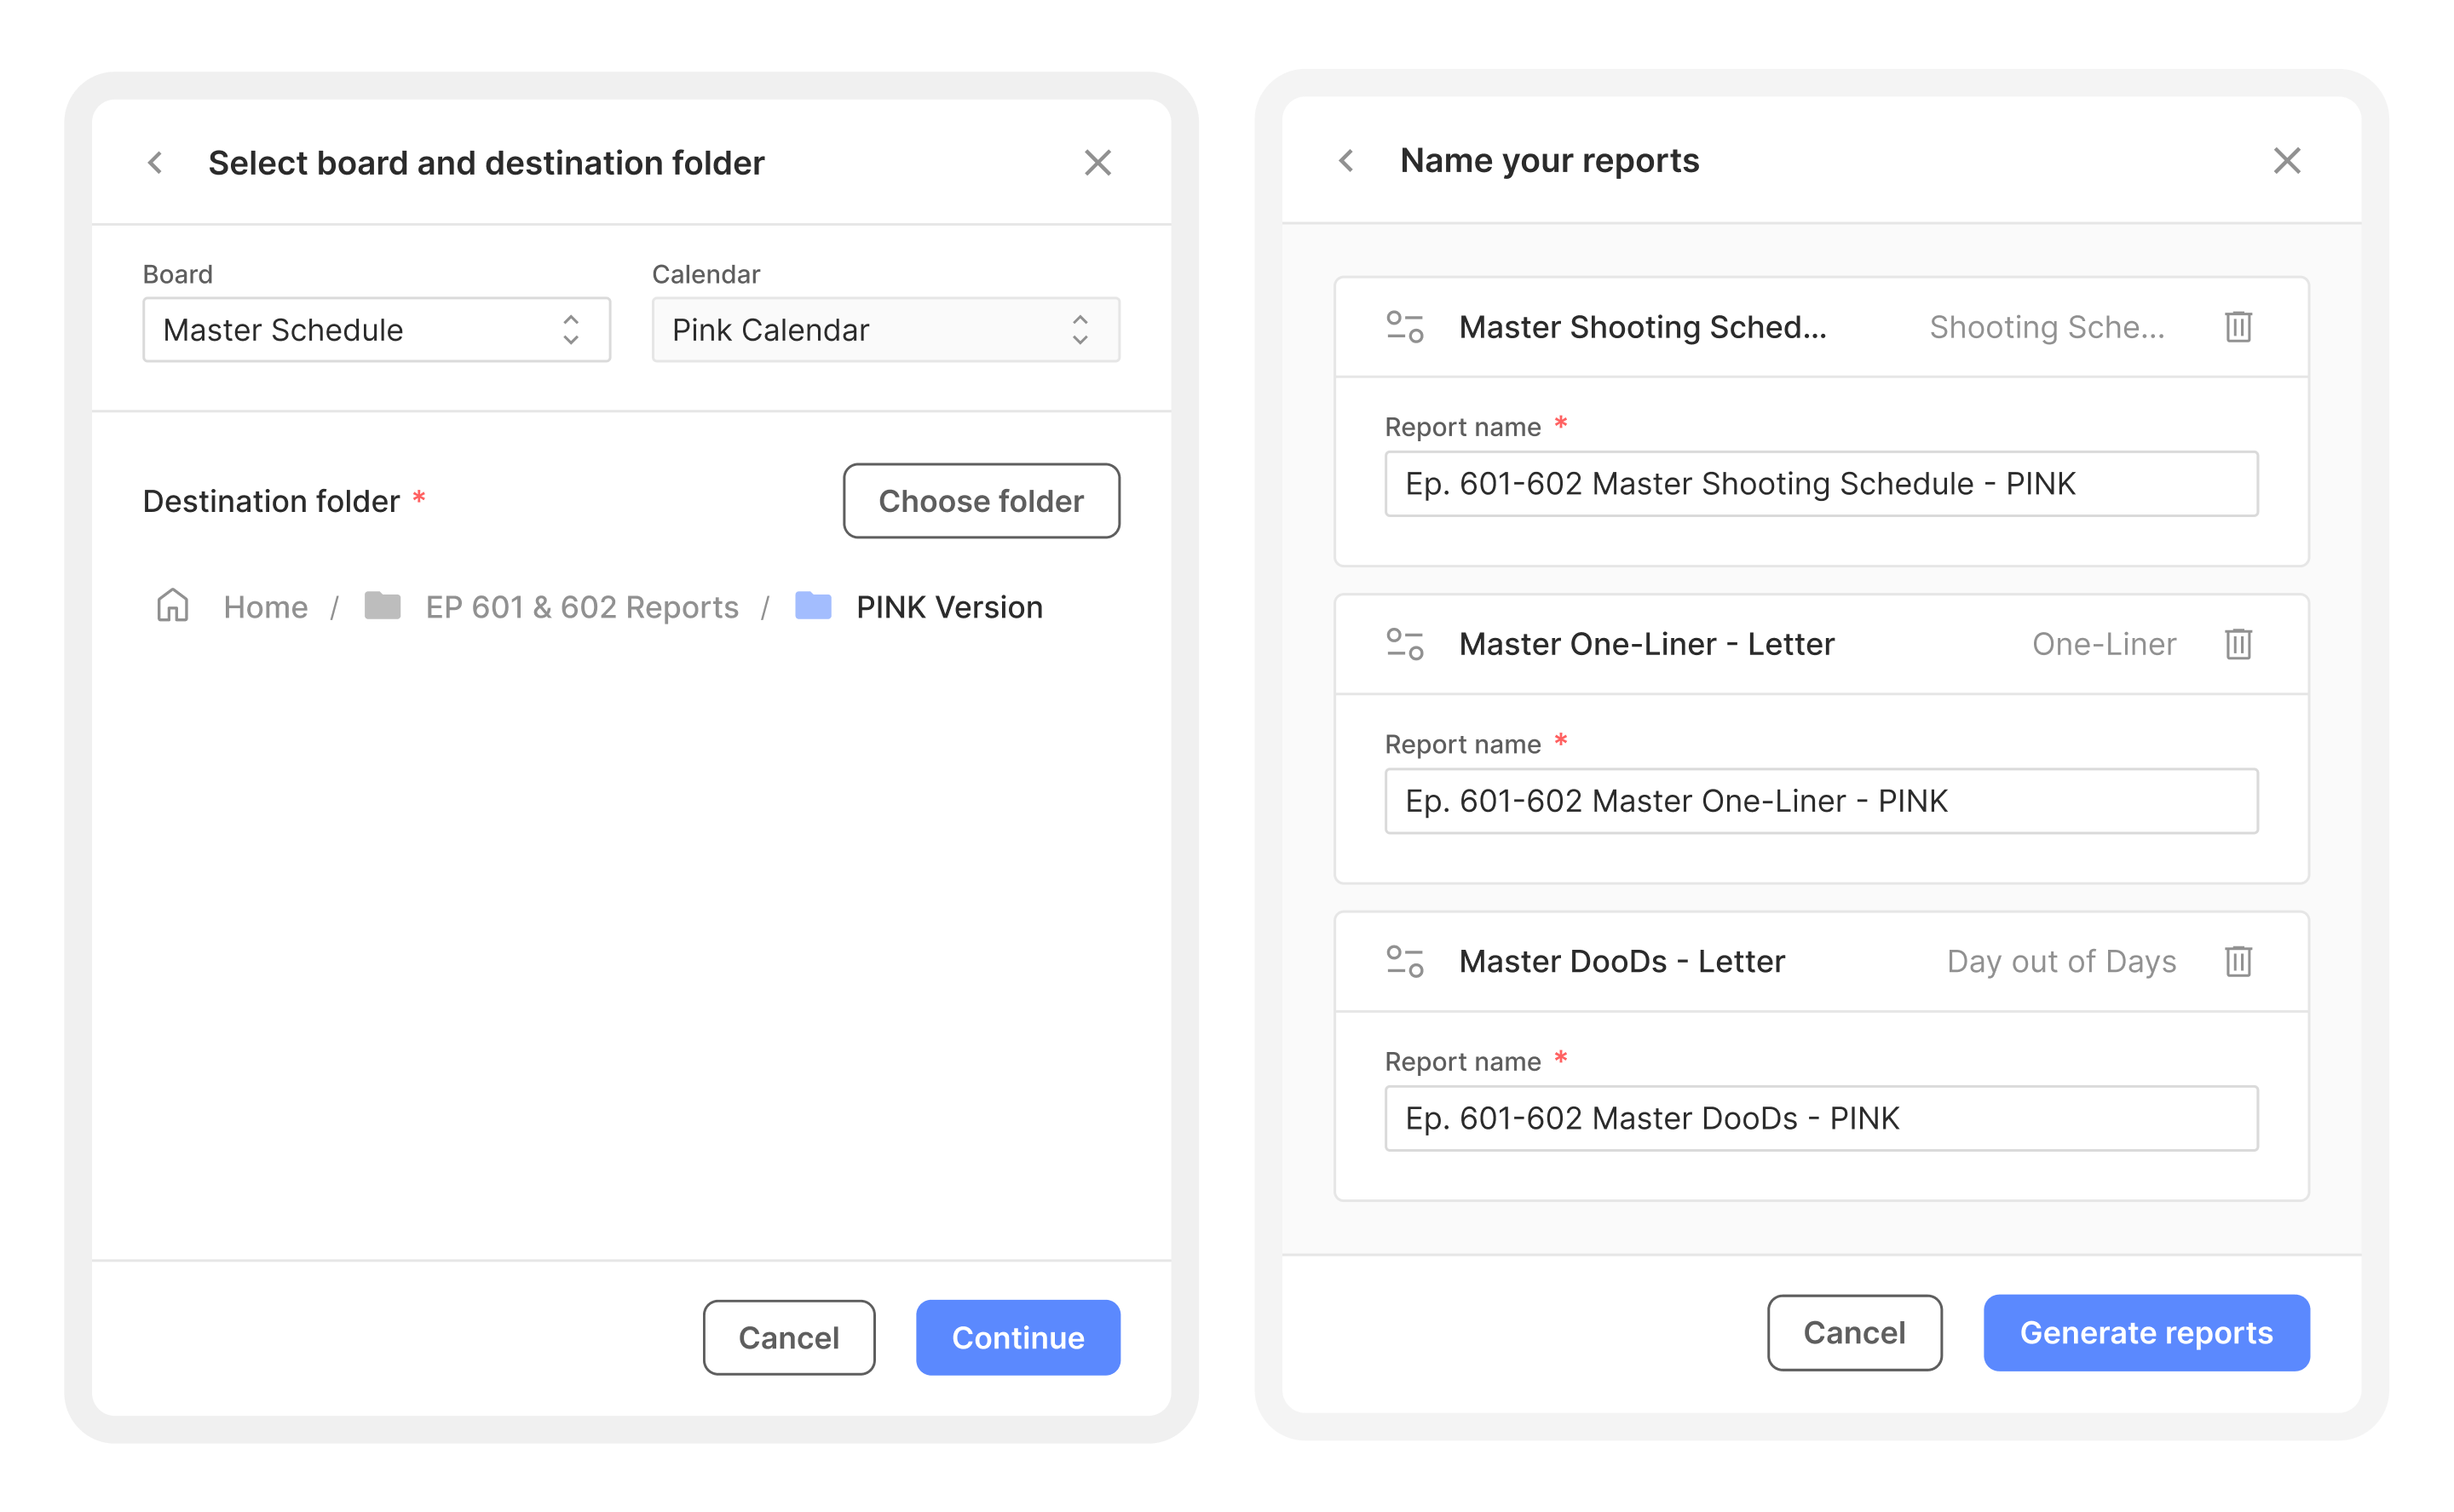
Select the Board, Calendar, and Destination folder for the generated reports.
Click Continue.
On the "Name your reports" screen, give each report a name (defaults are pre-filled based on the preset name and episode).
Click Generate reports.
You'll see a confirmation toast — e.g., "3 reports generated" — and your new reports appear in the destination folder.
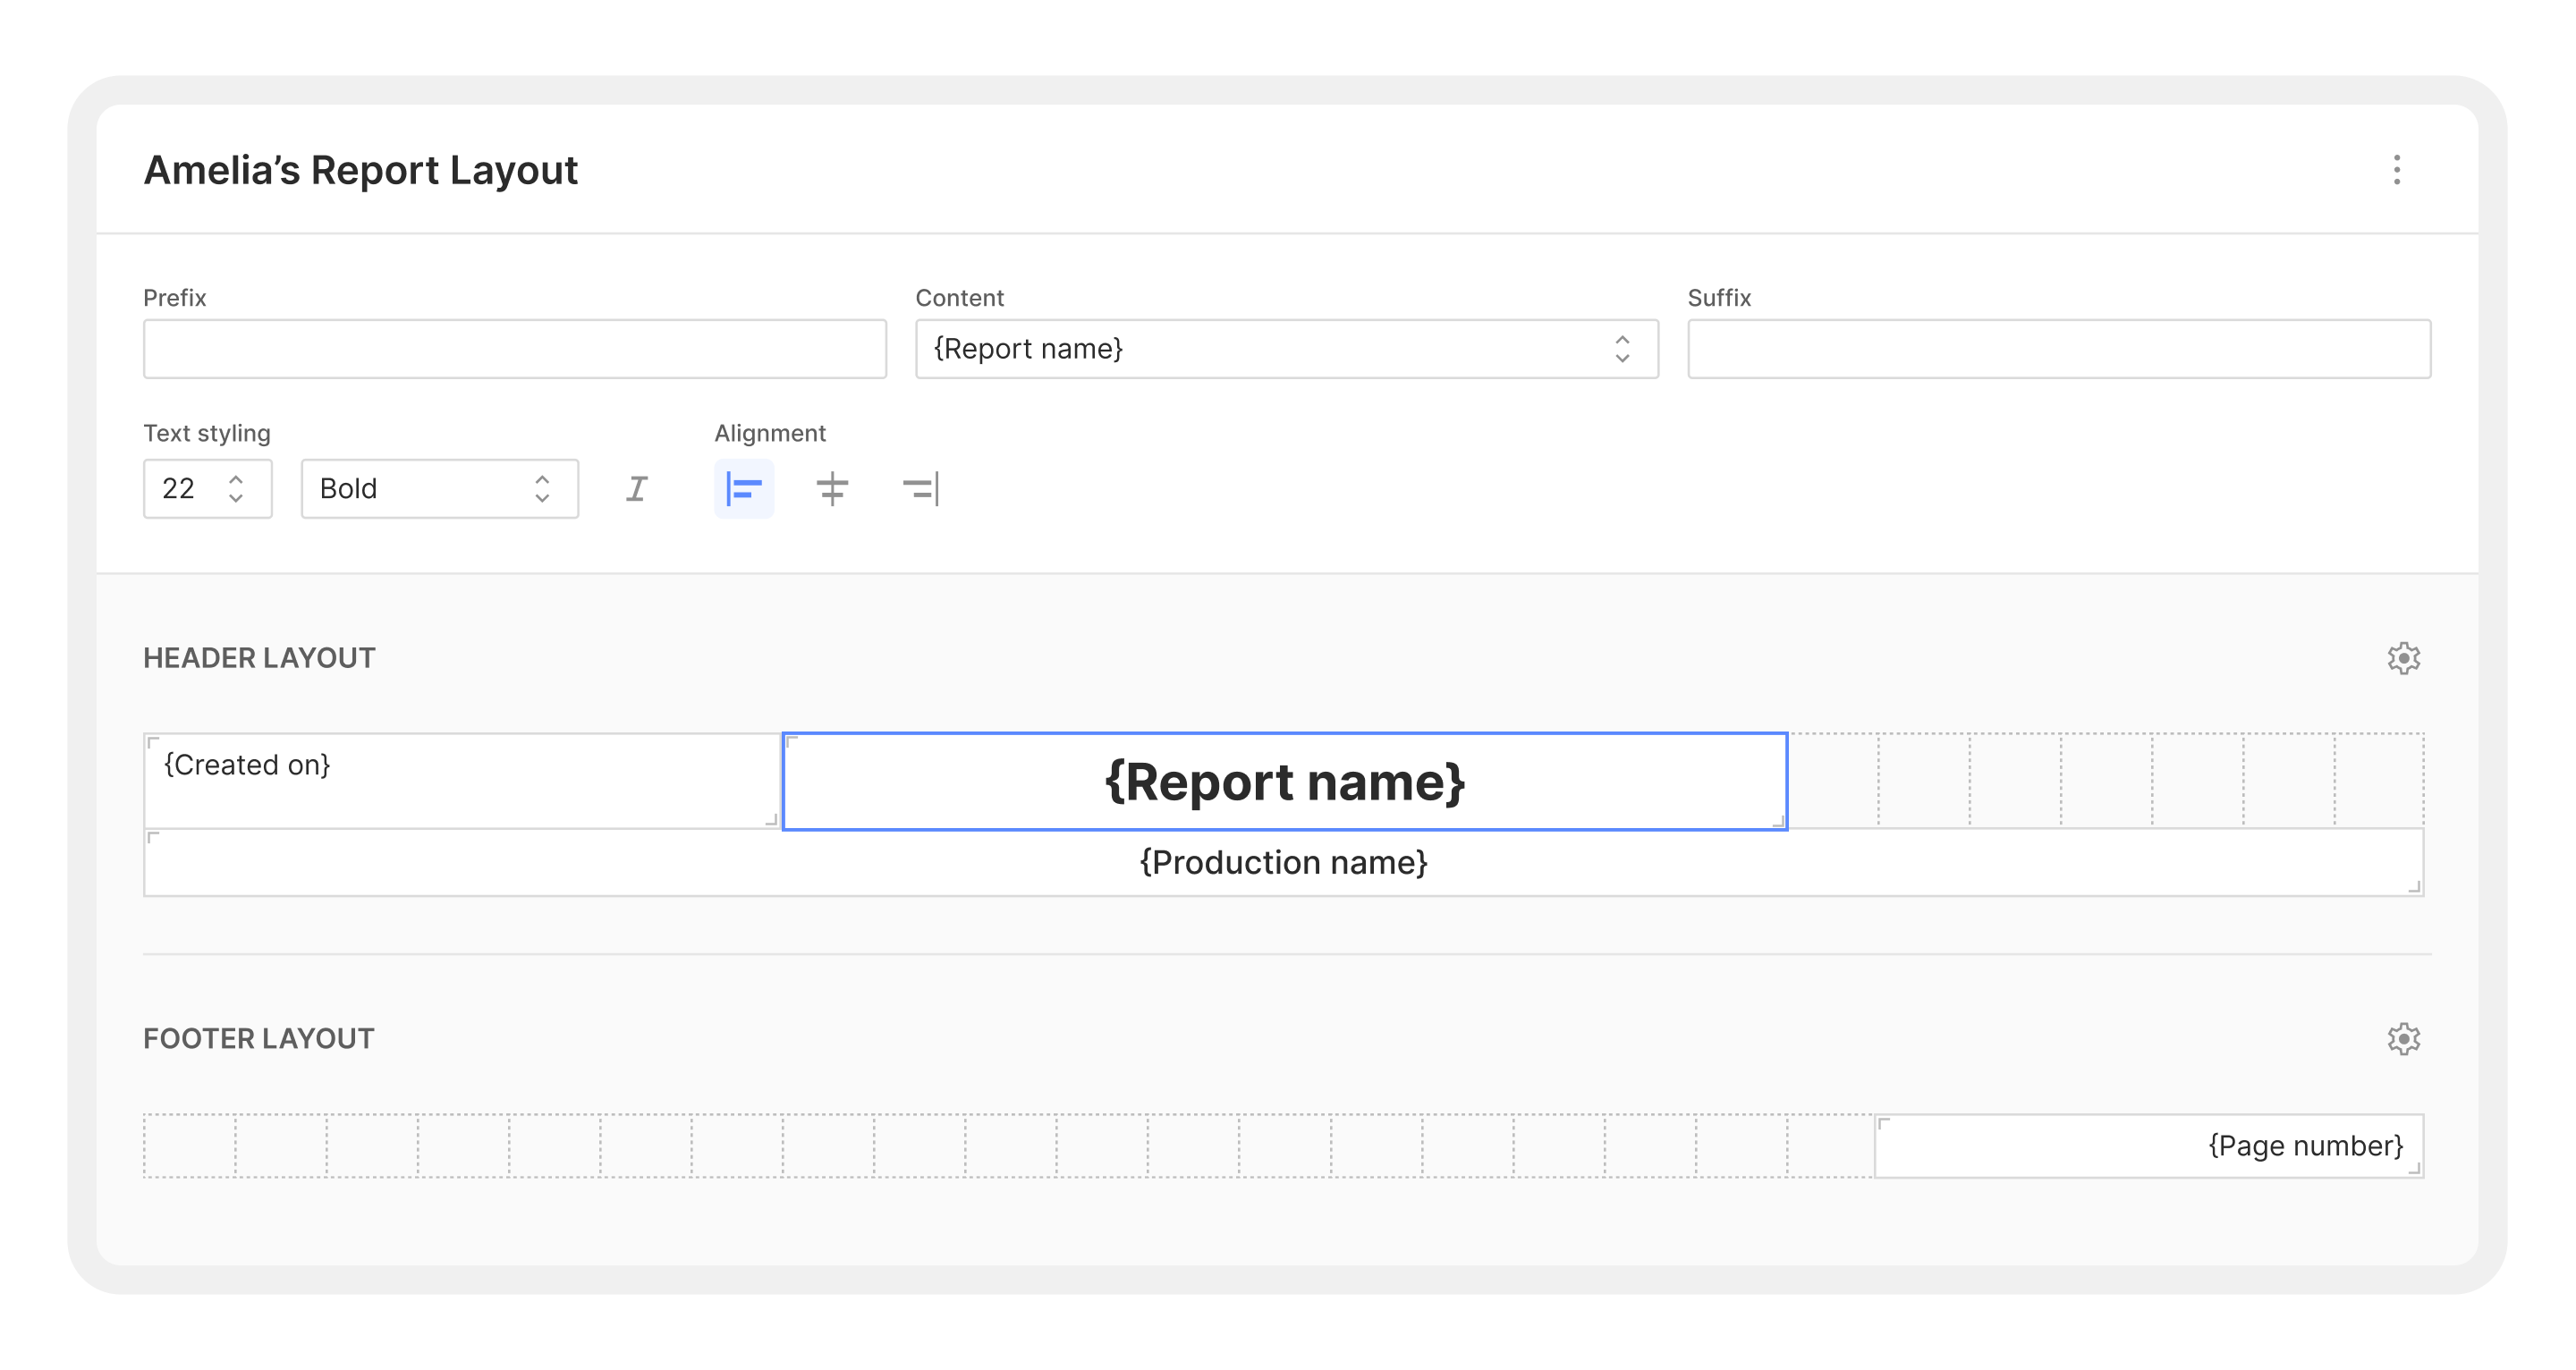
Report layouts: custom headers and footers
Report layouts let you design different headers and footers for different report types. One layout for your shooting schedule, another for the one-liner, another for the day-out-of-days, another for the calendar.
To access the layout builder:
From the Reports home screen, click Report layouts in the top-right corner.
Create or edit layouts with custom headers and footers.
When building a report, select your layout under Page layout > Header / footer layout in the sidebar.
The header in the PDF preview shows information like the report title, show name, creation timestamp, and any custom fields you've configured. The footer shows page numbers (e.g., "Page 1 of 82").
Tips for getting the most out of Reports
Use presets for your standard reports. If you generate the same types of reports every episode, save them as presets once and use "New reports from presets" to batch-generate them going forward. What used to be 20 minutes of configuration becomes a few clicks.
Organize presets in folders. Create folders like "Studio Export Presets" and "Internal Only Presets" to keep things clean — especially if multiple team members are using the same Cinapse file.
Check the preview before you save. Every setting change updates the preview in real time. Get in the habit of glancing at the right side before you hit Save report.
Match paper size to your output. If your production office prints on Legal, set it to Legal. If you're distributing PDFs digitally, Letter or A4 both work — just be consistent across your production.
Use layered filters instead of manual cleanup. If you've been generating full reports and manually removing sections, build a filter stack instead. It's faster and the output is clean every time.
Set up report layouts early. Configure your header and footer layouts at the start of a production, and every report you create will automatically inherit the right look.
Questions or feedback? Reach out to the Cinapse team. We're here to help.
Cinapse is proud to announce its acquisition by Wrapbook, Hollywood’s fastest-growing payroll and production finance platform. This partnership marks a major leap forward in unifying the workflows that power film and television — bringing scheduling, budgeting, payroll, cost reporting, and accounting into a single, modern ecosystem.
Production teams have always had to copy scene information from breakdown sheets to call sheets, which takes a lot of time. Not anymore! We're excited to share Cinapse's new connection with SetHero, which automatically moves your scene data from breakdowns to call sheets — so it's there when you need it!
Cinapse, the modern standard for film and television scheduling, is collaborating with Chapman University's Dodge College of Film and Media Arts, the No. 4 film school in the nation, providing every Dodge College student with access to Cinapse, empowering the next generation of filmmakers with cutting-edge scheduling tools used across the industry.